Hi. This post will be a tutorial on how to do ad-hoc networking in Ubuntu. Here’s what this post will focus on:
- Setting up an Ad-Hoc network.
- Scanning for Ad-Hoc networks and joining them.
- Detecting neighbour nodes in the network, and also verify their presence every interval.
- Data transfer between nodes in the network.
- Learning and enumerating other scenarios.
The prerequisites:
- Ubuntu OS, preferably 14.04 LTS and higher.
- python3 and basic knowledge of shell scripts.
We will focus on the requirements posted in this blog post.
Scanning for the Ad-Hoc network
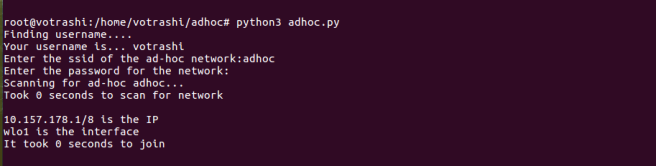
One node will setup the network. For other nodes to detect the network, the below shell script can be used to find Ad-Hoc networks of the same SSID. We will use nmcli and grep commands, former to scan for all wireless networks, latter to match an ad-hoc network of required SSID which is passed as first parameter while this program is invoked. Let us save the script below as scan.sh.
#!/bin/bash

# first param is ssid
echo "Scanning for ad-hoc $1..."

# Built-in seconds variable to show time elapsed to find the required network
SECONDS=0
searchResult=`nmcli dev wifi | grep -P -o '$1'.*?Ad-Hoc'`
echo "Took $SECONDS seconds to scan for network"
echo $searchResult # echo the matched networks
Creating/Joining the network
To set up the network, we will use some of the commands like ip, iwconfig, ifconfig, service, awk and cut in Ubuntu. Let us write a shell script to achieve the same. What we would generally need to connect to / set-up a network would be:
- Name/Identifier of the network – SSID of the network. To know more about SSIDs, click here.
- Password for joining the network. An overview of various security algorithms can be found here.
- We will use the WEP policy which employs a simple passkey login. To know more, click here.
- The ethernet interface through which you will connect to the network. We will, in this tutorial, use wireless interface. Since the wireless interfaces are named differently on different machines (depends in manufacturers), we can find the name of the wireless interface using ifconfig and awk commands.
- We will need to use a unique IP address. So, let us make use of IP addresses computed based on MAC address of the wireless interface.
The shell script below explains the process employed in creating/joining the network.
#!/bin/bash
#We will use the built-in SECONDS variable to find out time elapsed for the entire process
SECONDS=0
# Get the name of wireless interface
iface=`ifconfig -a | awk '/^w.[a-z]/{print $1}'`
# Get the MAC address of the interface
mac=`ifconfig -a | awk '/^w.[a-z]/{print $NF}'`
# There are 3 parameters that will be sent while invoking this script
# SSID, Passkey for network and Username of the user on the host
ssid=$1
password=$2
username=$3
# turn off network manager
sudo service network-manager stop
# deactivate the physical interface(wireless)
sudo ip link set "$iface" down
# set the interface's mode to Ad-Hoc
sudo iwconfig "$iface" mode ad-hoc
# make it decide channels automatically
sudo iwconfig "$iface" channel auto
# set the essid of the network to be same as the $ssid parameter
sudo iwconfig "$iface"; essid "$ssid"
# set the password as the $password parameter
sudo iwconfig "$iface" key "$password"
# activate the wireless interface
sudo ip link set "$iface" up
# compute the IP based on 4th, 5th and 6th octets of MAC address of the interface
str1=`echo $mac |cut -d':' -f4`
str2=`echo $mac |cut -d':' -f5`
str3=`echo $mac |cut -d':' -f6`
# convert the hexadecimal information to octets
o2=`echo $((0x$str1))`
o3=`echo $((0x$str2))`
o4=`echo $((0x$str3))`
# compute the IP
ip=10.$o2.$o3.$o4/8
# assign the IP to the interface
sudo ip addr add "$ip" dev "$iface"
# display the IP and interface
echo "$ip is the IP"
echo "$iface is the interface"
# show time elapsed till now
echo "It took $SECONDS seconds"
echo
sudo python3 sendUserName.py &
echo
sudo python3 broadcastPing.py &
echo
sudo ./receiver.sh "$username" &
echo
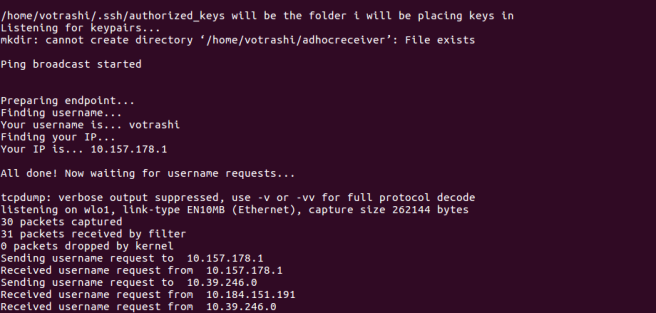
sudo mkdir /home/$username/adhocreceiver
sudo chmod 777 /home/$username/adhocreceiver
Let us name the above shell script as create.sh. The host can interact in the network soon /after the IP gets assigned in line 48. The same can be used for joining the network.
The lines 57, 60 and 63 invoke respectively the following programs:
- sendUsername.py
- Explained in Neighbor Discovery Section in the same post.
- broadcastPing.py
- Explained in Neighbor Discovery Section in the same post.
- receiver.sh
- Requires username as parameter.
- Explained in Data Transfer section.
Lines 66 and 67 create a directory for receiving data, and set permissions for successful data transfer. The same directory will be used in programs for data transfer.
Neighbor Discovery
Neighbor discovery in any node in the network involves two parts:
- The node telling other nodes about its presence.
- The node detecting other nodes.
We will discuss one possible method to achieve the same.
Coming to the first part, the below python code helps us in telling other nodes in the network about our presence. We ping the broadcast address of the network – 10.255.255.255. We call a shell command via python and make it run quietly in the background. It sends 10 packets, in every call until the nodes leave the network. Let us save the below python code as broadcastPing.py.
import subprocess
import os,time

# redirect all outputs and errors to Null File Directory of the host
null_fd = open(os.devnull,"w")

def startBroadcast():
  while True:
    subprocess.call("sudo ping -q -b -c 10 10.255.255.255",shell=True,stdout=null_fd,stderr=null_fd)

print("\nPing broadcast started\n")
startBroadcast()
Each and every node will be running broadcastPing.py in the background after the node is in the network. – line 60 in create.sh. Now let us move on to the second part, detecting other nodes in the network.
The algorithm of detecting other nodes in the network is as shown below:
Loop always:
- Usage of tcpdump and get only these broadcast packets in the channel.
- Make note of detected IPs.
- For each and every new IP detected, get the username of the host. This is required, later during data transfer.
- Finding out which nodes are active.
First we need a listener to be running on each node after joining the network to share the usernames which would be later required for data transfer. In line 57 of create.sh, we can see a call being made to sendUserName.py. The code of this program is as shown below. This registers a listener on each node on port 23000 (can be any port), answering “send” queries by other nodes with the hostname of each node. The process of registering the listener on the node will require the program to know the IP. The IP can be found out using the below shell script after the node is in the network. The same script also gives us the name of the wireless interface of the node.
Let us save the below shell script as print_ip_interface.sh.
#!/bin/bash

iface=`ifconfig -a | awk '/^w.[a-z]/{print $1}'`
mac=`ifconfig -a | awk '/^w.[a-z]/{print $NF}'`

str1=`echo $mac |cut -d':' -f4`
str2=`echo $mac |cut -d':' -f5`
str3=`echo $mac |cut -d':' -f6`

o2=`echo $((0x$str1))`
o3=`echo $((0x$str2))`
o4=`echo $((0x$str3))`

ip=10.$o2.$o3.$o4
echo $ip
echo $iface
The code for python program, sendUserName.py is as shown below.
import socket
import subprocess
import time
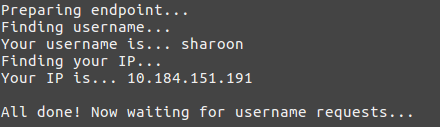
print("\nPreparing endpoint...")
print("Finding username...")
machine_username = subprocess.check_output(['who']).decode().split()[0]
print("Your username is...",machine_username)
print("Finding your IP...")
machine_ip,machine_interface = subprocess.check_output(['./print_ip_interface.sh']).decode("utf-8").strip().split()
print("Your IP is...",machine_ip)
print("\nAll done! Now waiting for username requests...\n")
def sendUserName():#on receiver
send_hostname_socket = socket.socket(socket.AF_INET,socket.SOCK_DGRAM)
send_hostname_socket.bind((machine_ip,23000))
while True:
data,sender_address = send_hostname_socket.recvfrom(512)
data = data.decode()
if data == "send":
print("Received username request from ",sender_address[0])
send_hostname_socket.sendto(machine_username.encode(),sender_address)
sendUserName()
The program sets up a port using UDP listener on each node. This will be invoked by create.sh and will be running in the background.
The python code below has implemented the algorithm mentioned above for detecting other nodes. Let us save the code below as detectNeighbours.py.
import subprocess
import socket
import time

ip_hostnames = dict()

def getHostNameNode(node_ip):#on sender
  get_hostname_socket = socket.socket(socket.AF_INET,socket.SOCK_DGRAM)
  print("Asking for username of ",node_ip," ......")
  get_hostname_socket.sendto("send".encode(),(node_ip,23000))
  node_hostname = get_hostname_socket.recvfrom(512)[0].decode()
  return node_hostname

def detectNeighbors():
  while True:
    tcpdump_output = subprocess.Popen("sudo tcpdump -c 30 \"broadcast\" | grep -P -o '([0-9]+\.[0-9]+\.[0-9]+\.[0-9]+).*? >'",stdout=subprocess.PIPE,shell=True)
    output_ips = tcpdump_output.stdout.read().decode("utf-8").splitlines()
    output_ips = list(set(output_ips))
    output_ips = [ i.split()[0] for i in output_ips ]
    for each_ip in output_ips:
      if each_ip not in ip_hostnames.keys():
        print("Getting user name at ",each_ip)
        ip_hostnames[each_ip] = getHostNameNode(each_ip)
    copy_ip_hostnames = dict(ip_hostnames)
    for each_ip in copy_ip_hostnames: # removes nodes which are no longer in the network
      node_status = subprocess.call("ping "+each_ip,stdout=subprocess.DEVNULL,shell=True)
      if node_status != 1:
        ip_hostnames.pop(each_ip)

detectNeighbors()
For every unique IP detected in ping broadcast output by tcpdump, and among them, for every new IP that was detected, the code asks the node for the username of the node. Remember, sendUsername.py will be the listener running on each node to respond back with the username. And for all IPs in the dictionary maintained by the program, the presence of the node is verified again by pinging that node.
We will be making additions to the same function for data transfer process.
Data Transfer between nodes
Among many ways to transfer data between two nodes, let us see the implementation of the same using scp utility. To send data to other nodes using scp, we require the receiver to accept data from the sender. One way to achieve this is receiver confirming(indirectly) data transfer request by sharing the password only with the sender. The sender will then send the file to the default directory created by lines 66,67 in create.sh. There are other ways, which employ shared key system, or asymmetric key system. We look forward to implement the same in the future.
After detection of nodes in the network, we will ask the user whether he wants to transfer data or exit the program or else, continue the neighbour discovery process. If the user wants to do data transfer, we will ask him to choose the IPs he wants to send data to. After selection of the IPs, the user will be asked the files/folders that should be sent to each IP. We need to write two shell scripts, one for sender to send selected data and receiver to listen for keys being shared to it by other nodes. Although we are not using the key system as of now, we will in the future write a separate post to achieve data transfer safely using the key system.
The shell script below is for sending the specified file to the user at the specified IP. One parameter(the last parameter) is to indicate whether that node needs to be shared the key (before first transfer only). You can neglect the key sharing part in both shell scripts. Let us save the script below as sender.sh.
#!/bin/bash

recipientIP=$1
hostName=$2
file=$3
val=$4 #indicates whether to send public key or not

sender_name=`who`

port=10000
echo $recipientIP
z=0
if [ "$val" -eq "$z" ]; then
 # need to send public key
 nc "$recipientIP" "$port" /home/$sender_name/.ssh/id_rsa.pub #use tcp
fi

# Built-in variable to find out the time elapsed for transfer of each file to receiver.
SECONDS=0
scp -r adhocDir/$3 "$hostName"@"$recipientIP":/home/$hostName/adhocreceiver/
echo "It took $SECONDS seconds for transfer of $3 to $hostName@$recipientIP"
The shell script below sets up a listener on the every node to receive and store inbounb public keys. Let us save it as receiver.sh.
#!/bin/bash

echo "/home/$1/.ssh/authorized_keys will be the folder i will be placing keys in"

while :
do
 echo "Listening for keypairs...";
 nc -l 10000 >> /home/$1/.ssh/authorized_keys
done
The detectNeighbours function shown in Neighbour Discovery part, will have the following additions after line 28. The flow in this code was already explained above. Each node will have data to be sent in a directory called adhocDir whose contents are displayed by executing ls command via python. Be sure to create this directory and move data to be sent into this directory before selecting files to be sent.
choice = int(input("Enter 0 for data transfer, 1 to exit:"))
if choice == 1:
subprocess.call("./refresh.sh",shell=True)
break
elif choice == 0:
print("Detected IPs and users were shown above, choose whom to send.")
#user chooses receivers #append it to receiver list
receiver_ips = []
while True:
choice = input("Enter detected IPs of your choice (1 to stop):\t")
if(choice == "1"):
break
receiver_ips.append(choice)
print("Choose files/folder to select:")
contents = subprocess.check_output("ls adhocDir",shell=True).decode().split()
pprint.pprint(contents)
#user will have selected directory or the files to be selected
files_to_be_sent = []
while True:
choice = input("Enter files of your choice (1 to stop):\t")
if(choice == "1"):
break
files_to_be_sent.append(choice)
for each_ip in receiver_ips:
node_status = subprocess.call("ping -c 5 "+each_ip,stdout=subprocess.DEVNULL,shell=True)
if node_status == 0:
#scp
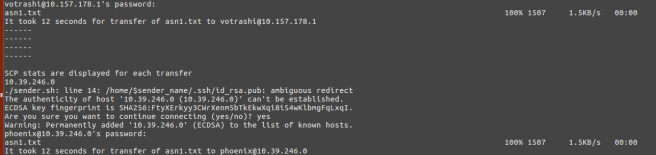
print("SCP stats are displayed for each transfer")
for each_file in files_to_be_sent:
if each_ip not in ip_pkey_received:
ip_pkey_received.append(each_ip)
subprocess.call("./sender.sh "+each_ip+" "+ip_hostnames[each_ip]+" "+each_file+" 0",shell=True)
else:
subprocess.call("./sender.sh "+each_ip+" "+ip_hostnames[each_ip]+" "+each_file+" 1",shell=True)
refresh.sh is a shell script that kills all launched daemons by create.sh. It also reverts changes made to interface’s IP and any changes that were reflected in networking processes run and maintained by each node. The code of refresh.sh is as shown below:
#!/bin/bash

echo "Before:"
ps aux | grep -P "sudo|10000"
echo "------------"

pid=`ps aux | grep -P "sudo ./receiver.sh" | awk '{print $2}' | head -n 1`
pid1=`ps aux | grep -P "nc -l 10000" | awk '{print $2}' | head -n 1`
echo "Killing keypair listener processes - $pid and $pid1..."
kill "$pid" "$pid1"
echo "...done!"
echo "------------"

pid=`ps aux | grep -P "sudo python3 broadcastPing.py" | awk '{print $2}' | head -n 1`
echo "Killing ping broadcaster process - $pid..."
kill "$pid"
echo "...done!"
echo "------------"

pid=`ps aux | grep -P "sudo python3 sendUserName.py" | awk '{print $2}' | head -n 1`
echo "Killing username listener process - $pid..."
kill "$pid";
echo "...done!";
echo "------------";

echo "After:";
sudo service network-manager start
ps aux | grep -P "sudo|10000";
Now the time has come to integrate all these features into one single master program. We have integrated all the codes, i.e., all the features are automatically invoked by calling one python program, adhoc.py which takes SSID of the network and passkey for the Ad-Hoc network as input. You can find the codes at Google Drive or on Github.
Learning
We hope you find this blog helpful. We learnt a lot in the process of achieving the requirements listed by Dr. Ram P Rustagi sir. Here is a small part of what we learnt in the entire process and under the guidance of RPR sir:
- Looking into man pages and interpreting them.
- Learnt many networking commands, which we were unaware of initially.
- Each wireless network has a cell associated with them. Nodes in the same cell and same network are able to talk with each other.
- If A initiates the network and B,C,D join the same, and then A leaves the network, B,C and D were able to talk with each other.
- If A,B,C,D and E are in the same network, and A,B move far away from C,D and E, both groups will have same cell associated with them. A and B can talk with each other. C,D and E can talk with each other.
- Pinging the sender during data transfer every 1 ms or less, affected the data transfer rate.
We achieved a throughput of 2MB/s using scp. We look forward achieve higher speeds and reduce power usage of each node while on the network. There are better ways for the neighbour discovery process and safer ways for exchanging data. Feel free to ask any questions that may occur to you after going through this blog post.
Regards,
TEAM LOOPBACK.